easiest way to clean shower tile grout

Soft abrasives remove scale without damaging tile and grout. Hard water that contains heavy amounts of lime and other minerals results in scale buildup. Scale problems often occur on bathroom tiles and the grout between the tiles since water is often left to dry on these surfaces. Frequent cleaning with the right tools is the easiest way to maintain the tiles and grout without scratches or damage. Tools Harsh abrasives damage both the tile and the grout between the tiles. Avoid heavy duty scouring powders and stiff brushes. Mild cleansers and abrasives work as well as the harsher alternatives without damaging the surface, although they may require more scrubbing and elbow grease for complete scale removal. Mildly abrasive sponges are usually mild enough for scrubbing tile and grout. Alternatively, use an old soft-bristled toothbrush to get into the small spaces between the tiles. Scale Removal Typical lime scale has a chalky white appearance, but it doesn't flake from the tile or grout easily.

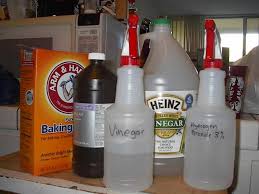
Mixing equal parts vinegar and baking soda together to form a paste supplies a mild abrasive. The acidic vinegar cuts through the scale while the abrasive baking soda scrubs the loosened deposits from the tile and grout surface. Smear the paste over the entire affected area and leave it to sit for five to 10 minutes. Scrub the tile and grout with the abrasive sponge or toothbrush then rinse with clear water. The tile may require multiple applications and scrubs, depending on the severity of the scale buildup. Removing Discoloration Lime scale may also leave behind a rusty red, brown or a greenish-blue discoloration, depending on other metals present in the hard water. Mixing lemon juice and borax to form a paste and scrubbing the tile and grout with the solution removes rusty stains. Cream of tartar and hydrogen peroxide can minimize brown, black and greenish-blue stains. Chlorine bleach or tile cleaners containing bleach can also lighten these stains if they are used after the scale deposits have been removed.

References North Carolina Cooperative Extension Service: Removing Mineral Deposits From Household SurfacesWashington State University: Creative Cleaning Photo Credits Jupiterimages/Polka Dot/Getty Images Suggest a Correction
best way to clean dog piss from carpetWhen I started this site it was intended to only focus on issues of installation.
carpet cleaner dog smellThrough research I discovered a greater demand for information related to existing flooring. This particular subject was at the top of the list. So, like every politician has promised and failed to deliver, I will give the people what they want! Well, as much as I can, anyway. Out of curiosity I typed “how to clean grout” and “tile” into Google. I only made it through two pages of sites before I was fed up with all the crap from so-called “experts”.

Ninety percent of what I discovered was bull! Common sense dictates that you do not use bleach or hydrogen-peroxide (same effect) on any type of colored grout at all – ever. Yet this was the suggestion of most “experts”. If you happen to have white sanded grout in your tile, you’re set. If not, you’re gonna screw it up more. What’s “sanded” have to do with it, you may ask. Without knowing the product you’re cleaning, it will be difficult to clean it properly. That being said typed, let’s start there. For something that confuses some so much, this is actually relatively simple. Drum roll please . . . sanded grout has sand in it. The implications are greater, though. Sanded grout is used for grout lines (the space between the tiles) greater than 1/8 of an inch. I use it for grout lines 1/16 and larger. The reason sand is added is to prevent the grout from shrinking as it cures. If you attempt to use unsanded or non-sanded grout for larger grout lines it will shrink (sometimes as much as 50%) and look like hell.

Sanded grout is also much more stable and durable. Unsanded grout is used in smaller grout lines because sanded is difficult to force into the space. Because of this using sanded grout in smaller grout lines leaves open the possibility of not completely filling them which will, in time, lead to grout cracking, chipping out, and a number of other things that make an otherwise perfect tile job look sub-par. I dunno, I can’t see it from here. Sorry, I’m a bit warped, I stare at floors all day. There are several ways to determine this (the type of grout, not whether or not I’m warped). If you have large grout lines chances are it’s sanded grout. If it’s a shower with 4 X 4 or 6 X 6 inch tiles chances are it’s unsanded. Run your finger across your grout, if it’s rough you have sanded grout. If you run your thumbnail along the grout line and you scrape a bit of grout out of it, you probably have non-sanded. If your grout is smooth, it is non-sanded. The methods below describe how to clean grout in tile that is not natural stone – granite, marble, travertine, etc.
You do not want to scrub these with a stiff brush as you risk scratching the stone. If you have natural stone the best solution is to either try the method below using a cotton cloth rather than a stiff brush, or purchasing a commercial stone cleaner. Not a grocery store bathroom cleaner, a specialized stone cleaner available at places like Home Depot and follow the instructions. Seriously, follow the instructions. As with anything you do to your tile, or flooring in general, make sure to test the method in an inconspicuous spot to ensure it won’t harm your tile or grout. Let’s deal with sanded grout first. After it cures, sanded grout is actually less dense than unsanded. This means more “stuff” permeates further into the grout itself. Anything you use to clean sanded grout will completely saturate into the grout, all the way to the floor beneath. You can use bleach on sanded white grout. With a bleach/water ratio of 1/10 (umm, 1 bleach, 10 water, but you knew that) and a stiff brush you can scrub the grout lines.

The grout is already white (or used to be) so bleach will not discolor it. Spray or dab the solution onto the stain and let it sit for about two minutes. Then take the stiff brush and scrub. Scrub hard, you’re not going to hurt it. Then rinse it with clean water. Repeat as necessary, as they say. Hey moron, you may say, I don’t have white grout in my floor! That’s all right, no one else does either. The same method applies. Use white vinegar rather than bleach. Start with a 50/50 ratio of white vinegar and water, spray or dab it onto the area, let it sit, then rinse. You can gradually make the mixture stronger as needed. Start with 50/50 . If that isn’t strong enough simply add additional vinegar. You can use straight white vinegar as well, it shouldn’t harm your tile or grout at all. Just scrub it until the grout gives up and you’ve scrubbed it into submission. Unsanded grout, because it is more dense, is less apt to let stains in much farther than the initial top layer of the grout.

So you just have to scrub that. Using the above method should work well. The problem most people have is that they think if they scrub some of the actual grout out of the tile it will somehow compromise the tile itself – it will not. Grout has absolutely nothing to do with holding the tiles in place, stabilizing the tile, or any number of other things people are led to believe by the aforementioned “experts”. This method should take care of most stains and discolorations in your grout. But, you say, all you’ve told me is to scrub the grout. I do not claim to be an expert on the easy way. I am, however, well versed on the correct way. The above is the correct way. There is no magical solution that will gather up a stain and pull it out of the grout (unless it’s blood, hydrogen-peroxide will do that. Don’t ask me how I know that). While the grout does not make a difference with the stability of the tile itself, a lot of on the market cleaners will eventually compromise the integrity of the grout.